🤷🏽 Why Svelte and SvelteKit? #
Before getting going on this starting out Svelte and SvelteKit tutorial, we should probably first take a look at what Svelte is and why use it. When you started out in web development, you probably first built out a site using HTML, JavaScript, and CSS. Svelte is another technology for building out websites which does a lot of heaving lifting for you. We will see that Svelte markup is a superset of HTML which makes coding up forms, looping over arrays and other essentials simple.
Svelte does not only make writing markup easier; it also helps you with CSS and without getting in the way. You can write your CSS in the same files as your markup. On top, features like class directives and the new style directives provide a great interface for altering your page styling based on some JavaScript logic. Additionally, Svelte makes it easy to add animations to your app. We will add a flip animation to our app using out-of-the-box Svelte — no extra libraries needed!
Why not React? #
As we just mentioned, Svelte, markup is closely related to HTML, which can make learning Svelte easier than React. You might consider learning Svelte before React for this reason. Svelte also stands out from React in compiling to vanilla JavaScript, which browsers already understand. This means with a Svelte page, there is no overhead of sending libraries to site visitors’ devices. Since you ship JavaScript, you do not need a library to interpret Svelte code in the browser. This helps make Svelte apps fast. That said, React was designed with complex apps in mind, and you may still consider using it for such applications.
Svelte vs. SvelteKit #
SvelteKit is Svelte’s official way of building apps using Svelte. That said, there are other offerings. You can use Astro if you want to use Svelte components as well as React or Vue components in your app. Astro also offers partial hydration, which can help your apps load faster. You might also consider something like Slinkity if you want partial hydration but like working in 11ty.
⚡️ Starting out Svelte and SvelteKit: Getting up‑to‑date on Latest Svelte Features #
Although the tutorial is called “Starting out with Svelte and SvelteKit”, because there have been so many recent enhancements, you might also find yourself learning something if you have taken an older tutorial. @const tags together with style directives were released with Svelte 3.46 at the start of 2022 .
We will see @const tags are handy in #each loops in Svelte. Svelte local constants let you define a constant variable, based on loop parameters, once and use it as many times as needed. This is instead of repeating the calculation each time you use the value. One example (which we will look at) is looping over a list of RGB colours and converting the RGB value to a hex value once, even when we need it multiple times within the loop.
Meanwhile, style directives (e.g. style:background-color={backgroundColour}) make it easier to change styling right from your CSS markup. You can achieve the same results with a style= attribute, though you might miss out on some potential for optimization using style directives. Besides, the style directive syntax is a little cleaner too!
🧱 Starting out Svelte and SvelteKit: What We’re Building #
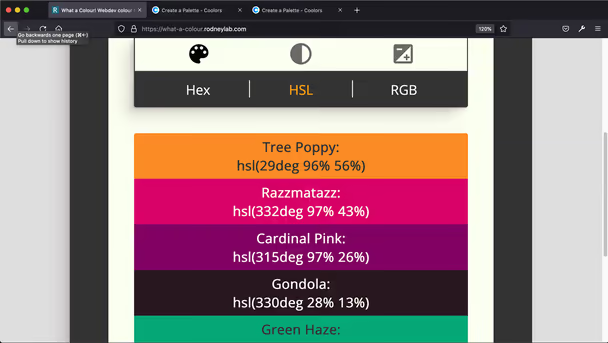
While we’re getting to know Svelte and its new features, we will create a basic app, which you will probably find helpful in designing other apps. It helps with colours. You can use it to get names for colours from The Color API . As well as that, you build up a colour palette and check which colour combinations give you accessible contrast ratios. Finally, once you have fixed your palette colour, you can convert hex colours to RGB and HSL values and generate tints and shades to improve your user experience.
There are a few sites which help with some or all of these tasks, but you will get to learn some cutting-edge Svelte on the way to building your own. Also, because you are building out the app yourself, you can customize it to suit your own tastes and needs. We consider a few extensions in the homework suggestions for each section, though your imagination is the only limit!

See the live version of the finished What-a-Colour app which we will build in this tutorial.
👍🏽 Starting out Svelte and SvelteKit: What we will Cover #
What we cover:
- New SvelteKit 1.0 routing API,
style:directives,class:directives,- animation: flip animation in a Svelte app,
- using TypeScript with Svelte,
#eachblocks: looping through lists and arrays in Svelte,#awaitblocks: rendering placeholder content while waiting to get data back from a remote API,- local constants in
#eachblocks:@consttags,- binding text input values and radio input values to JavaScript values,
- adding icons to your Svelte app.
⛔️ What we won’t Cover #
- Tailwind, vanilla extract and other CSS frameworks,
- CSS color-contrast proposal: although this makes work on finding an accessible text colour easier, it will also take away some fun in exploring Svelte style directives,
- Svelte in other frameworks like Astro and Slinkity.
🌱 Starting out Svelte and SvelteKit: Let’s get Going! #
If all that sounds like what you came here for, then why don’t we get going? We will start by spinning up a brand new SvelteKit TypeScript project.
Starting out Svelte and SvelteKit: Beginners’ Tutorial
1 hour of video content, with in-depth text explanations and complete code blocks.
Starting out Svelte and SvelteKit: Beginners’ Tutorial
1 hour of video content, with in-depth text explanations and complete code blocks.
🏁 Starting out Svelte and SvelteKit: Beginners’ Tutorial: Summary #
What is the difference between Svelte and SvelteKit? #
- Svelte and SvelteKit are both tools in the same project. Svelte is language to help in authoring websites. Typically, Svelte files have a `<script>` block containing JavaScript code to make your page interactive, a template section and a `<style>` tag for CSS. The template section uses a language which is a superset of HTML. This makes using Svelte a smaller step for anyone already familiar with creating HTML / JavaScript / CSS apps. Importantly, the Svelte template makes common patterns like rendering elements conditionally and looping through arrays fairly simple. That’s Svelte but what is SvelteKit? SvelteKit is just one framework for creating websites using the Svelte language. Much like Next.js is a framework for creating sites with the React library. Alternatives for creating a Svelte app are Astro and Slinkity.
What are Svelte class directives? #
- Svelte class directives are a fantastic tool for styling Svelte apps and pages. Often you will add a class to an element to style it slightly differently to its siblings. Let’s say we have a list of navigation links in the header on a site. We want to style the link for the active page differently, so it stands out, improving user experience. A common way to-do this is to add a `selected` class to the active nav item, then add some CSS to target this `.selected` class. The JavaScript to add the extra class to the nav element can look messy. Svelte class directives let you write something as simple as `class:selected` on the nav element, to add the selected class when that nav item is active.
How do you add animation in a Svelte app? #
- You will be surprised how easy it is to add a flip animation, for example, to a Svelte page. Let’s say you have an array of to-do list elements rendered, and you want to animate adding or removing elements from it. First, you import flip from Svelte (this is built in, no external packages needed): `import { flip } from 'svelte/animate'`. Then, in the Svelte markup for the to-do element, we add an animate attribute. Let's say we have the to-do elements as article tags. In this case, we can do: `<article animate:flip={{ duration: 500 }}>`. Here, the 500 means an animation duration of 500ms. One extra piece you might need is to add a key to the elements in your #each block. It’s that simple! Of course, there are other configuration options to explore.
🙌🏽 Starting out Svelte and SvelteKit: Wrapping Up #
In this tutorial, we built out a complete SvelteKit TypeScript app:
- how to set up your system for starting out Svelte and SvelteKit including setting up pnpm tooling and VSCode extensions,
- using new Svelte features like style directives to update CSS custom properties (CSS variables) from your Svelte markup,
- how to build and deploy a static SvelteKit app.
I hope you found the tutorial useful and am keen to hear where your Svelte and SvelteKit journey takes you next!

